Paint this scene with rust, distressed wood, forest, sky with absolute photorealism.
Imagine the
satisfaction of successfully creating
accurate color, textures, depth and lighting
resulting in an amazing painting.

Fantastic Project
Enjoy the experience of creating a scene with
more realism than you've ever imagined painting.
Want rapid growth and understanding?
You don't need to wait years to figure everything out. YThis course will advance your skills in just a few days.

From Cars to Barns to Forests
These techniques apply to all. If you are tired of seeing all the amazing art posted on social media, and want to create something equal to (or better than) the best that’s out there, here's your chance to learn how Dru creates his photorealistic paintings.
Welcome to the Next Level
This is airbrushing evolved. We offer content not taught anywhere else in the world.
Enjoy success even if you are an absolute beginner
Everyone starts somewhere. With solid training, you can cut years (or more likely, decades) off of the time it takes to achieve photorealistic mastery. Now it’s possible for you to gain control of your technique in a fraction of the time that it would take if you practiced on your own.


Color theory that solves all your color matching challenges
Learn all about Color Buffer Theory, perceptual awareness, elements of vision, transparents vs opaques, rules of realism, recovery exercises, and how to begin a painting.....and that's on the first day!
The skills you will gain
We aren’t just limited to teaching you all about using the airbrush. We include a variety of other media tricks to help you make your present and future artwork the best possible.
And we supply everything! All you need to do is to show up ready to learn.

What you will learn
01
Layout and composition
This is the most important foundation of any painting, yet it is the most overlooked. Here you will learn how to position the elements to make use of negative space.
02
The 8 differences between Opaque and Transparent paint
When should you use transparent paint, and when should you use opaque paint? Each has unique characteristics which need to be considered first. You will learn all the differences, and when and why to use each.
03
How light and depth impact how we see
Surfaces appear differently depending on conditions. We will show you the differences, and how to manage them.
04
The elements of a photorealistic painting
In order to re-create reality, we must first be able to see and understand visual reality. We will show you how to observe reality more accurately and help you overcome all limitations.
05
2 ways to avoid that cut-out look
When masks are involved, objects will often look like they are cut out and pasted on to the painting. You will learn how to overcome this problem.
06
Color Buffer Theory
Our original theory was initially conceived in the eighties, and is now practiced in some form all over the airbrush world. This is a practical approach to color and color mixing that actually corresponds to the way paint behaves. It is simple, yet comprehensive in scope.
07
How to use the Color Wheel
The color wheel is a compass. We will show you how to choose the right color wheel and how to use it correctly. It can be your best aid when mixing and matching colors.
08
How to match color....perfectly
Color can be intimidating, but fear of color will be a thing of the past after we show you how to match a color dead-on every time. You will love this process, especially if you are tired of painting in shades of grey.
09
Understanding simultaneous contrast and the role it plays in your paintings
Simultaneous contrast is the illusion that colors that come in contact with each other seem more different than they actually are. We will show you how to harness this problem with color discrimination and turn it into one of your most powerful assets.
10
How to survive catastrophic errors
Soon or later, we all make painting mistakes. If you don’t know how to repair a mistake, your painting will be compromised. We will teach you several ways to repair a mistake, so you will always choose the correct one for your painting.
11
Transferring your image to the painting
There are 5 ways to maintain your proportions when transferring your photograph to the painting surface. Learn which ones are most effective.
12
Different types of shields and when to use them
The visual world contains a variety of edges. Some edges are soft, some are hard, and some are in between. You will learn many different useful techniques to create every type of edges.
13
Creating the illusion of depth
There are many tricks to creating realistic depth. We'll explore them all.
14
Ways to use a simple hand-held shield
The shield is more versatile than most artist realize. For example, the bounce method allows you to add subtle, almost imperceptible adjustments to you painting.
15
From zero to success in a few days
Almost all our courses are designed for absolute beginners, so don't worry if you've never used an airbrush before. We offer a Foundations Classroom in a Box where you can train at home. When you get to class, we will show you even more, and we don’t limit your training to just the airbrush. There are many tools that complement the airbrush, and we want you to be able to enjoy having the best of them in your arsenal.
16
3 eraser techniques that will make a difference in your art
The eraser is a versatile instrument, and when properly used, and blend or cut like a knife. We will show you different types of erasers and how you can get the most out of any eraser.
17
Using the blade correctly
The blade can be a wonderful ally, but it will destroy your painting if you don’t use it correctly. We will show you exactly how to hold it, and how to operate it on different surfaces.
18
The rules to make lighting look real
If you want your surfaces to look more realistic, then follow these simple rules. You will learn them all, as well as some extra tips for greater realism.
19
Frisket vs paper
Frisket can be one of the best tools for creating crisp edges, but it can also cause problems with your painting surface. Paper has its advantages and disadvantages as a mask too. You will learn all about both types.
20
Managing edges and transitions
The trickiest part of painting is controlling edges. Adjusting edges is necessary, but can be a bit tricky. We will teach you how to change the sharpness or softness of an edge after you’ve created it.
21
5 masking techniques that work
A mask can be used in a variety of ways. For example, you could use split paper/frisket techniques , shield reveal or shield conceal methods to create a line. You will learn which masks are best for any given situation.
22
How to create subtlety
Subtlety tis the key to realism. We will show you several techniques to quickly achieve it.
23
Buffered Contrast Reduction, and how to use it
Contrast, along with proportions, and edges, can make or break a painting. Controlling contrast is simple using Buffered Contrast Reduction. We will explain what it is and how to use it.
24
How to find and fix problems in your paintings
Sometimes you can’t see the forest for the trees, and often mistakes go unnoticed. We will show you a simple technique that allows you to quickly spot problem areas that you would have otherwise overlooked.
25
How to develop observation techniques to expand your visual discrimination
Its difficult to paint anything accurately until you can really see it. We will teach you how to visually dismantle an object, then reassemble it on the painting surface.
26
Difficult transitions
Some complex transitions are a bit tricky to navigate. We will show you how to manage them.
27
Depth of Field
One of the most difficult effects to pull off convincingly is depth of field, or that out of focus effect in a background or foreground. We will show you how to maintain realistic soft focus.
28
How to salvage the worst disasters in your paintings
Sometimes we make horrific mistakes. The trick is knowing how to deal with them, and hide them in the finished product. We will show you how.
29
Alternative ways to match colors
Its difficult to paint anything accurately until you can really see it. We will teach you how to visually dismantle an object, then reassemble it on the painting surface.
30
Selling your work
Learning about the business of art and marketing allows you, as an artist, to earn money for your creations. You will learn about pricing, galleries, copyright, prints, giclées, originals, and artist representatives.
State of the Art Classroom
unlike any other on the planet
Color corrected lighting. Central Ventilation
On-site lodging on a 120-acre campus
nestled in a National Forest

What students are saying

I attended Dru's workshop with the hope of learning to paint, I left with the ability to "see" and a system that allowed me to develop my own understanding of painting and colours. Your system has given me the freedom to explore my own creativity.
Paul MacDonald
(Airvengers) Australia

Dru's teachings showed me how to create great detail and gave me the ability to achieve PHOTOREALISM in my artworks. Thank you for pioneering the world of photorealism in airbrushing, I doubt I would have got here without your long nights and many experiments .
David Naylor
Spain
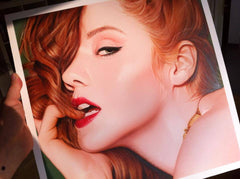
Dru's workshop influenced the way I paint and gave me some new concepts, knowledge and skills to implement into the way I worked today I recommend it!
Mitch Lowther
(Airbrush tutor) Australia
About Blair School of Realism
Our school is located at 4935 Buckhead Road, Blair, SC, 29015.
Lodging
Our school features on-site lodging and meals for those who wish to purchase the lodging and meals package.
Class Hours
Class begins at 9 am and ends at 7:30pm. Occasionally we will return to class and paint more after dinner. A 1-hour lunch break is held at 1:30 pm.
If you have questions about this class, the direct line to the school here is 803-630-8450 or write to Samantha at blairsam95@gmail.com

Our
Guarantee
We are so sure that we offer the best airbrush course in the world that we are willing to offer you tuition money back if you don’t notice an immediate improvement in your art, and in the way you see the world after taking this course.

Painting Photorealistic Scenes
You will learn a lot of techniques in your workshop, but the most valuable lesson gained is for you to better understand and see the world differently, especially when it comes to color.
As artists, we take our inspiration from the visual world around us and re-create it on board, metal, or canvas. At the Blair School, we would like to show you how to do it more successfully.
Getting here
The school address is 4935 Buckhead Road, Blair, SC, 29015, which is 90 minutes from the Charlotte airport. Students are responsible for their own transportation from the airport, and we recommend Uber or Lyft. We will provide a free shuttle to the airport on the last day of class (Sunday) but be sure to schedule your flight after 5 pm to allow travel time to the airport.
Plan on arriving the evening before classes. Try to arrive at the school between 5 pm and 7 pm if possible, at the Charlotte, NC airport.
Food and Lodging
Private rooms with baths are available as an add-on for students who wish to reside at the school during classes. You will want to arrive the evening before the classes and depart on the last day of class.
Breakfast is at 8:30 am, Lunch is at 1:00 pm, and Dinner is served at 7:30 pm. If you have special dietary requirements, you must notify us when you enroll to ensure we can prepare properly for your attendance.
Virtual Option
We offer this workshop as a virtual workshop too. Materials and supplies are sent directly to your door and the class is broadcast to you via Zoom. Click here for more information.
